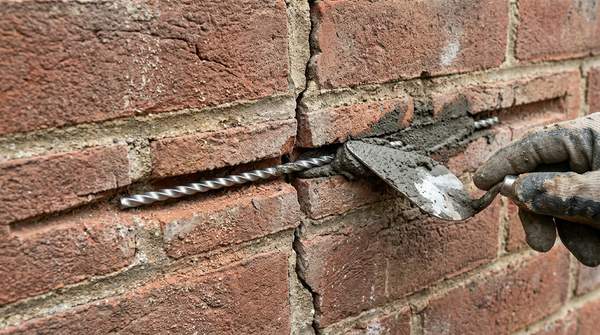
A helical bar may disappear inside a brick wall after repointing, but the quality of the prepared mortar joint remains part of the repair. A chase that wanders into brick edges, retains cutting dust or exposes unsound masonry changes the conditions in which the reinforcement must be embedded.
HeliMate Australia supplies helical reinforcement, EzyBond, EzyGrout and a diamond mortar raking disc for suitable masonry repair work. Its crack-stitching guide provides a practical sequence for preparing horizontal joints before the bars are bedded and the brickwork is restored.
Begin With the Brickwork, Not the Cutting Tool
Masonry joints vary according to building age, mortar composition and previous maintenance. A hard modern cement joint can resist cutting, while an older lime-rich joint may be associated with softer bricks that chip or crumble when handled aggressively.
A contractor first identifies the reinforcement courses from the approved repair layout and examines the masonry along those lines. Cracked units, previous cement repairs and weathered mortar may influence how the specified chase can be prepared without damaging sound material.
The joint also needs to provide anchorage beyond the visible crack. Near a window reveal, wall return or corner, the available horizontal run may affect the repair detail before any mortar is removed.
Match the Raking Method to the Joint
HeliMate’s thick diamond mortar raking disc is listed for brick, block and concrete joint preparation, with a 7mm cutting thickness, a 22.23mm bore and 125mm or 180mm disc diameter options. Those dimensions give trades a defined accessory to assess for equipment compatible with the required work.
The original masonry determines the preparation method. Historic lime mortar frequently responds better to carefully controlled hand or oscillating tools, while hard cement repairs may call for different cutting equipment.
| Joint condition | Preparation consideration | What the contractor is protecting |
|---|---|---|
| Sound modern mortar | Appropriate controlled mechanical removal | Specified chase geometry and sound brick edges |
| Older lime-rich joints | Suitable hand or oscillating tools | Softer bricks and surviving original mortar |
| Hard cement patches in older walls | Careful removal of the harder repair material | Adjacent historic brick faces and softer backing mortar |
| Rendered masonry | Locate the underlying joint before preparation | Sound masonry and surrounding finish |
Heritage Victoria’s guidance on repointing with lime mortars recommends hand or oscillating removal where these methods are effective and describes controlled techniques for removing hard cement mortar. That guidance provides a sound basis for working around fragile or historically significant brickwork.
Understand Disc Thickness and Chase Width
A mortar raking disc’s thickness is one tool dimension; the prepared chase has its own specified width and depth. HeliMate’s general crack-stitching guide illustrates horizontal slots 8–10mm wide and 30–40mm deep, prepared for helical bars embedded in bonding material.
The listed HeliMate disc is 7mm thick, so its nominal cutting thickness is different from the guide’s illustrative finished slot width. The contractor must follow the approved chase detail and the tool manufacturer’s operating requirements rather than assume one pass automatically creates the specified joint.
Disc diameter is another separate dimension. HeliMate’s 125mm and 180mm options must be matched with a suitably rated tool, compatible guarding, operating speed and the working area available on site.
Controlled preparation is particularly important around brick edges. An overrun into the face of a brick can remain visible after pointing, while excessive material removal can affect the masonry surrounding the reinforcement.
Build Silica Controls Into the Cutting Method
Mortar, brick and concrete cutting can release respirable crystalline silica. Safe Work Australia identifies masonry cutting and grinding as dust-producing activities and describes controls including suitable on-tool extraction, wet suppression and respiratory protection.
The selected controls need to suit the actual equipment and work environment. Water suppression requires equipment designed for wet use, while appropriate extraction and containment can help protect workers and people near occupied buildings.
Cleaning practices are part of the same risk management. A suitable hazardous-dust vacuum can remove debris from prepared joints without the exposure risks created by ordinary dry sweeping or uncontrolled compressed-air blowing.
These arrangements should be established before cutting begins, particularly when many slots are prepared across one elevation. The crew can then work consistently without treating dust management as a separate task to address afterwards.
Prepare the Slots in an Orderly Sequence
HeliMate’s installation guide links joint preparation directly to the placement of reinforcement. Once the wall has been assessed and the approved repair positions are marked, the following sequence keeps the work organised.
- Mark the selected horizontal joints. Confirm the locations and lengths shown on the repair design, including the anchorage required beyond each crack. Identify openings and fragile bricks along the intended path.
- Set up the appropriate cutting method. Select the disc or alternative tool that suits the mortar and the specified chase. Establish dust extraction or other required controls, and protect nearby finishes.
- Remove mortar to the approved dimensions. Work carefully along the marked joint, preserving sound brick edges and avoiding unnecessary disturbance to adjoining courses. Check progress where the mortar condition changes.
- Clean the exposed chase. Use suitable dust-controlled methods to remove loose mortar and debris. Inspect the surfaces that will receive the bedding material.
- Check the slot and masonry condition. Confirm its position, depth, width and continuity against the repair detail. Refer unexpected crumbling, fractured bricks or obstructions for appropriate treatment before bedding the bar.
- Prepare the bonding product and reinforcement. Bring the specified HeliMate bar and selected EzyBond or EzyGrout into the work area, following the applicable instructions for substrate preparation and placement.
The sequence gives the installer opportunities to inspect the receiving masonry before the reinforcement becomes concealed. It also helps keep cutting, cleaning and bedding coordinated when several repair locations are being prepared.
Clean Surfaces Before Bedding the Bar
Cutting can leave fine dust and loose mortar at the back and sides of the chase. Those particles can interrupt contact between the bedding material and the surrounding masonry, so the cleaned slot needs to be inspected before installation continues.
HeliMate’s guide describes an initial layer of bonding material followed by insertion of the helical bar and a second layer to encapsulate it. Consistent contact along the joint depends on sound surfaces and adequate space around the specified reinforcement.
HeliMate supplies 6mm and 8mm straight helical bars in 1,000mm lengths, together with coil options in both diameters. The installed bar dimensions and the chosen bonding system are established by the repair specification, allowing the prepared joint to accommodate the intended assembly.
The final surface remains part of the masonry finish. Once the bedding material reaches the appropriate curing condition, the joint can be repointed with mortar suited to the original wall.
Finish the Repair Without Losing the Brick Pattern
A crack-stitching repair often crosses prominent areas of exposed brickwork, where changes in colour, joint depth or brick edges can draw attention. Preserving the original bond pattern begins during preparation and continues through the finished pointing.
For a weathered façade, mortar matching involves more than pigment. Sand colour, binder type, texture and joint profile influence whether the repair sits naturally beside existing material, especially on older buildings with lime-rich mortar.
Photographs of prepared slots and placed reinforcement can document work that will later be concealed. They may also support inspection requirements on larger remedial projects before the mortar finish is restored.
Select the HeliMate Preparation Tools for the Job
HeliMate Australia’s 7mm diamond mortar raking disc is available in two disc diameters, with helical bars and bonding products available from the same specialist range. Choose the raking disc and reinforcement materials that match your approved joint-preparation method from HeliMate Australia’s masonry repair catalogue.